Many esoteric aspects of the minicom package are no longer relevant in today’s world. It’s highly doubtful that you’re going to make use of the dialing directory or the automatic zmodem download facilities. What you will use, however, is the ability to jack directly into attached devices. Menus drive it along with some basic key commands, so if you’ve mastered GNU nano you can already use minicom without even reading the man page.
Installing minicom and Accessing a Cisco Port
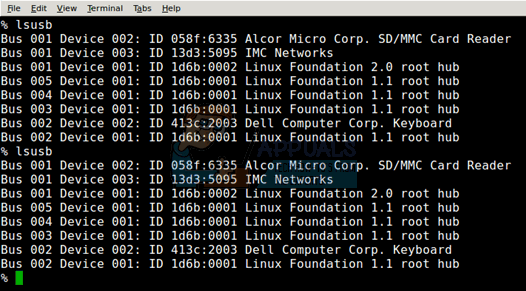
Get to a root command prompt by typing sudo -i, sudo bash or sudo tcsh. Virtual consoles on Ubuntu Server work just fine for this. You can also work from a graphical root console you start through gksu or merely through the applications link. The Unity Dash has one under the System listings, as does the LX Panel menu. You can also start one from the Whisker menu in Xfce or from the menu in Gnome-Shell and Mate. Once you’re in this shell, push F11 to get to a full screen environment that will make things much easier to see. You might be required to enter your administration password. Once you have root access, you’ll need to type apt-get install minicom to install the packages. If the apt-get routine asks you to approve the installation, then push the y key and then depress the enter key. Installation should take only a few moments if you have all of your repositories up to date. You can always run apt-get update to make sure that they all are. You’ll have some configuration options to set once you’ve installed the program. First, make sure that the cable that connects your workstation to the Cisco console port isn’t currently plugged in. From the bash or tcsh prompt you have root access at, type lsusb and push the enter key. Look at the results, which should list everything currently plugged into your machine.
Mentions of any Linux Foundation #.# root hub equipment is referring to the ports themselves, and not anything plugged into them. The numerical values merely refer to the revision of the USB ports themselves. Attach the cord between your workstation and your Cisco device, and then run lsusb again. Whatever entry is different is the name of the console device port. If the two lists are identical, then your workstation didn’t recognize you plugging the cord in for some reason. If you’re working with a traditional old-school serial cable, then you’ll potentially need to restart to force the Linux kernel to recognize it.
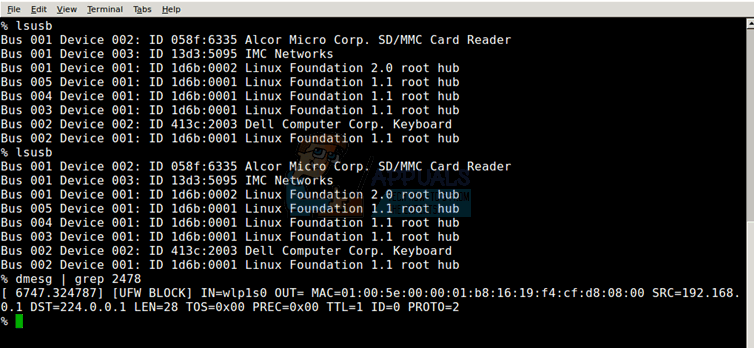
The first part of the device ID number is the vendor code and the second is the product. In case the serial USB port isn’t configured yet, you’ll need to do so with the modprobe command. Use modprobe usbserial vendor=0x#### product=0x####, replacing the octothorpe symbols with the correct hexidecimal codes from the lsusb command. The vendor code will more than likely got set to 0x2478, so you can find the device by using the following command:
You should see the location of the device, but if nothing comes up, then Linux still isn’t recognizing your device. You can list your tty commands by issuing dmesg | grep tty from the prompt. If you get no response or an error message, then this is yet again a sign the Cisco device isn’t responding correctly. While USB devices should enumerate inside of the kernel as soon as you plug them in, this isn’t always true when working with some sort of serial converter. Try plugging the cord in several times to see if you can get any sort of response, and reboot once more if you don’t.
Look in this list for a new identifier you found before from the grep 2478 command. Find the line with this identifier and that will device you the device name Linux gave your connection. It should be easy to find not only because the hexadecimal identifiers are the same, but also because it will follow some name such as ttyUSB0 or ttyUSB1, which should stand out. It’s doubtful you have more than one USB-to-RS-232 console attached anyway, but sometimes Linux will name your first terminal ttyUSB1 instead of ttyUSB0 for various reasons. Now run minicom -s and push the arrow down key until you get to the “Serial Port Setup” option. Hit enter, push A and then backspace to the first slash mark. You should change the value to /dev/ttyUSB0 or /dev/ttyUSB1 depending on which name Linux gave to your connection before. When you have it set correctly, push the enter key again. You’ll need to set the baud rate to 9600, the data bit value to 8 and the stop bit value to 1. Make sure that Parity is set to none, since your connection won’t support any sort of parity bit. Push the C key to set the baud rate to 9600 and the V key for the correct data bits setting. Enter L for the parity bit to disable it, and then set the stop bit to 1 by striking the W key. As with many of these packages, your mileage may vary, so you might have to change a few of these configuration options around if something about your Cisco installation is at all unorthodox. If you have a note about some sort of alternate configuration to use, then use these instead. A bar at the bottom of the minicom screen should provide additional information about button presses, which follows the manner in which GNU nano does the same.
What is a Terminal EmulatorFix: Pseudo-terminal will not be allocated because stdin is not a terminalHow to Perform a Port Scan on your Network using Port ScannerHow to Fix Lost Terminal Windows on the Linux Desktop


