Today we’ll show you how to customize the Quick Access Toolbar with additional default commands from the “Customize Quick Access Toolbar” menu, the ribbon, and the File menu. We’ll also show you how to show and hide the ribbon using the “Customize Quick Access Toolbar” menu.
Show & Minimize The Ribbon Using The Quick Access Toolbar Menu
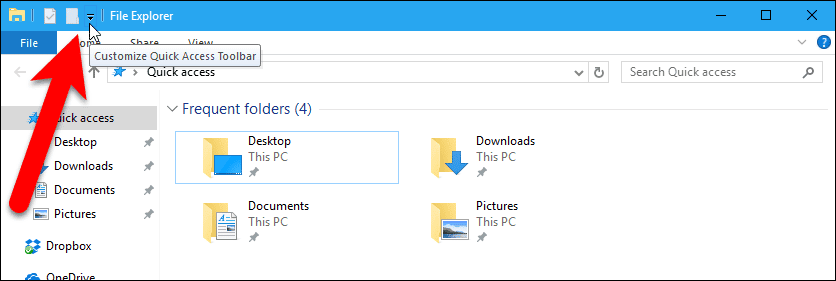
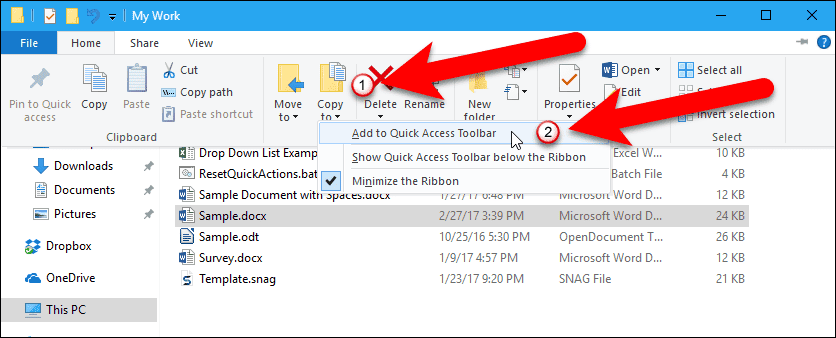
First, we’ll show you how to show and hide the ribbon using the “Customize Quick Access Toolbar” menu. It seems like this feature is a bit out of place on a menu that allows you to customize the Quick Access Toolbar, but it’s a useful option anyway. By default, the ribbon is minimized or hidden, with only the titles of the tabs showing. When you click on a tab name, that tab on the ribbon displays. Once you’ve selected a command on that tab, the ribbon hides again. If you don’t like this behavior, you can have the ribbon showing all the time. To do this, click the down arrow button on the right side of the Quick Access Toolbar and select “Minimize the Ribbon” from the drop-down menu so the check mark is removed.
Change The Location Of The Quick Access Toolbar
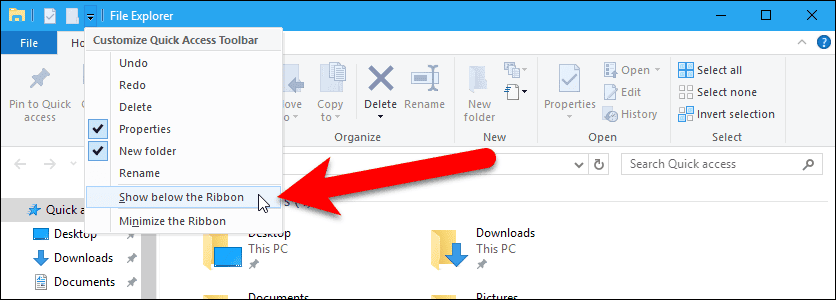
By default, the Quick Access Toolbar is located above the ribbon on the File Explorer title bar. If you prefer the Quick Access Toolbar to be located below the ribbon, click the down arrow button on the toolbar and select “Show below the Ribbon” from the drop-down menu.
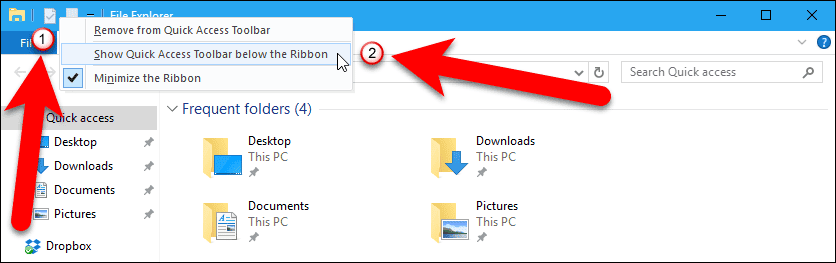
You can also right-click on any of the buttons on the Quick Access Toolbar and select “Show Quick Access Toolbar below the Ribbon“.
To show the Quick Access Toolbar above the ribbon again, click the down arrow button and select “Show above the Ribbon” from the drop-down menu. Or, you can right-click on any of the buttons on the toolbar and select “Show Quick Access Toolbar above the Ribbon“.
Show & Hide Quick Access Toolbar Default Commands
There are six default commands you can show on the Ribbon. As we mentioned, two of those commands are shown initially, “Properties” and “New folder“. To show any of the other four default commands, click the down arrow button on the toolbar and select any unchecked command on the drop-down menu, for example, “Undo“.
The “Undo” command is added to the Quick Access Toolbar.
To remove a command from the Quick Access Toolbar, click on the drop-down arrow on the toolbar. Select the checked command to uncheck it and remove it from the toolbar.
You can also remove a command from the Quick Access Toolbar by right-clicking on it. Select “Remove from Quick Access Toolbar” from the pop-up menu.
Add & Remove Ribbon Commands On The Quick Access Toolbar
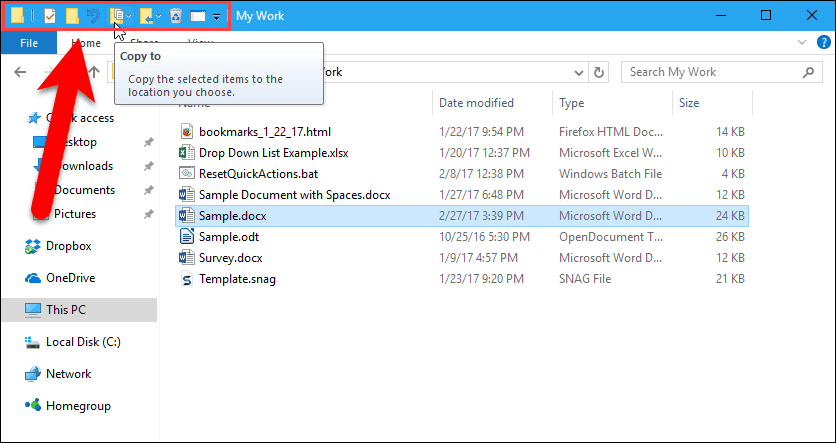
In addition to the six default commands, you can add commands from the ribbon to the Quick Access Toolbar. Copying and pasting files and folders is easy in File Explorer using the “Ctrl+C” and “Ctrl+V” shortcuts, respectively. However, as of Windows 8/8.1, File Explorer also allows you to copy or move files and folders to specific locations using the “Copy to” and “Move to” commands on the Home tab on the ribbon. These two commands would be useful to add to the Quick Access Toolbar. We’ll start with the “Copy to” command. If you have the ribbon minimized, click the “Home” tab to expand it. Then, right-click on the “Copy to” button and select “Add to Quick Access Toolbar” from the pop-up menu.
If you right-click on a command on the ribbon that’s already on the Quick Access Toolbar, the “Add to Quick Access Toolbar” is grayed out and not available.
To remove a command from the Quick Access Toolbar that you added from the ribbon, right-click on that button on the toolbar and select “Remove from Quick Access Toolbar” from the pop-up menu.
Add The Empty Recycle Bin Command To The Quick Access Toolbar
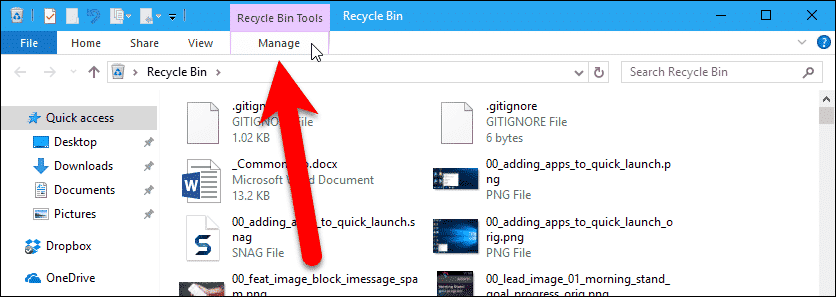
You can also add commands that are on tabs you only see on the ribbon in certain situations. For example, the “Empty Recycle Bin” command is on the “Recycle Bin Tools/Manage” tab. This is available when the Recycle Bin is open. We’re going to add the “Empty Recycle Bin” command to the Quick Access Toolbar, so we can empty the Recycle Bin from within File Explorer with one click. Open the Recycle Bin by double-clicking the “Recycle Bin” icon on the desktop.
In the File Explorer window that opens, click the “Manage” tab under “Recycle Bin Tools“.
Then, right-click on the “Empty Recycle Bin” icon and select “Add to Quick Access Toolbar” from the pop-up menu.
Now, even when the Recycle Bin is not open, we can empty it by clicking the “Empty Recycle Bin” in any open File Explorer window.
Add & Remove File Menu Commands On The Quick Access Toolbar
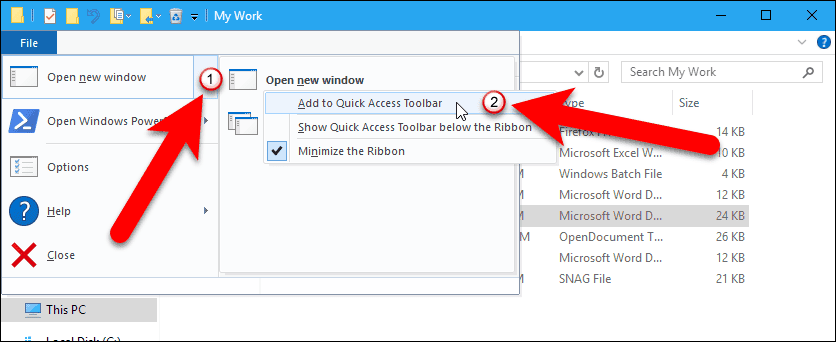
You can also add commands to the Quick Access Toolbar from the File menu in File Explorer. Click “File” to open the menu and go to the command you want to add, but don’t click on it. Instead, right-click on the command and select “Add to Quick Access Toolbar” from the pop-up menu.
Back Up Your Quick Access Toolbar Settings
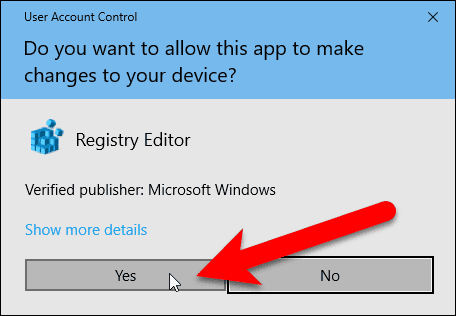
Once you’ve added the commands you want to the Quick Access Toolbar, you can back up the toolbar. This is useful if you want to transfer the customized Quick Access Toolbar to another computer, or if you need to reinstall Windows. In addition to backing up the Quick Access Toolbar, this procedure also backs up the ribbon setting. We’re going to access the registry to back up the Quick Access Toolbar, but we’re not going to change anything at this point. We would only make a change to the registry when we restore the backed up Quick Access Toolbar, but we’ll get to that later. Press the “Windows key+R” to open the “Run” dialog box. Type “regedit” (without the quotes) in the “Open” box and click the “OK” button.
If the User Account Control (UAC) dialog box displays, click “Yes” to continue. NOTE: You may not see this dialog box, depending on your User Account Control settings. We don’t recommend disabling UAC entirely, however.
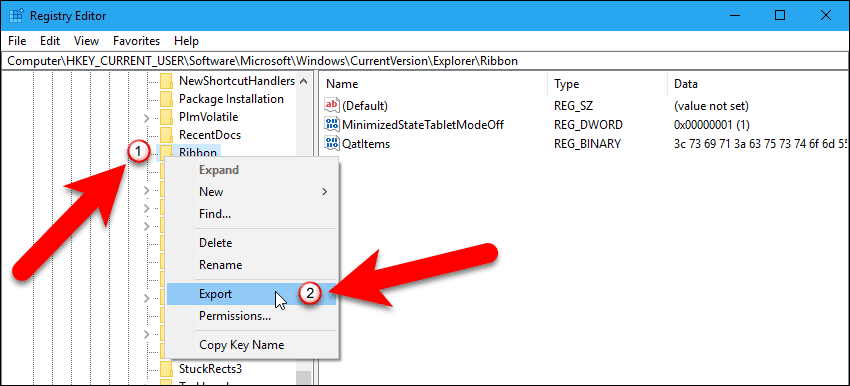
The Quick Access Toolbar settings are stored in the “QatItems” value in the “Ribbon” key. To back up these settings, we’re going to export the “Ribbon” key to a .reg file. In the Registry Editor, use the left sidebar to navigate to the following key: Then, right-click on the “Ribbon” key and select “Export” from the pop-up menu.
On the “Export Registry File” dialog box, make sure “Selected branch” is selected under “Export range“. Then navigate to the location where you want to save the .reg file. Enter a name for the .reg file in the “File name” box and click the “Save” button.
To exit the Registry Editor, go to “File” > “Exit“.
Reset The Quick Access Toolbar
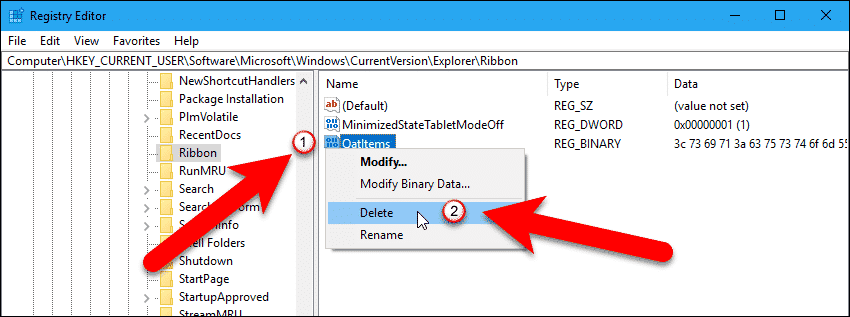
If you want to go back to the default, initial setup for the Quick Access Toolbar, you can reset it. To do this, open the Registry Editor as described in the previous section and go to the following key again: To reset the Quick Access Toolbar, right-click on the “QatItems” value in the right pane and select “Delete” from the pop-up menu. Remember, this is the value that stores all the settings for the Quick Access Toolbar.
On the “Confirm Value Delete” dialog box, click the “Yes” button to finish deleting the “QatItems” value. Don’t worry. You’re not breaking anything by deleting this value. The “QatItems” value is recreated the next time you open File Explorer and the default Quick Access Toolbar is set up again.
Restore Your Quick Access Toolbar Settings
To restore your backed up Quick Access Toolbar settings, simply go to the location where you saved your .reg file and double-click on it.
Again, if the User Account Control (UAC) dialog box displays, click “Yes” to continue. NOTE: You may not see this dialog box, depending on your User Account Control settings. We don’t recommend disabling UAC entirely, however.
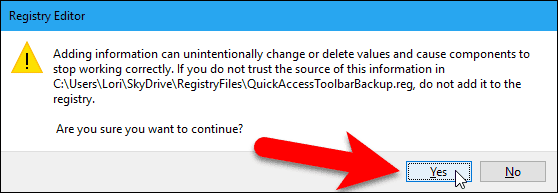
A confirmation dialog box displays making sure you want to continue making changes to the Registry Editor. Since this is the registry key you exported yourself, you can be confident it’s safe to use. NOTE: Be careful not to use any .reg files from unknown sources as they can cause Windows to stop working correctly.
A dialog box displays telling you the keys and values in your .reg file were successfully added to the registry. Click the “OK” button to close this dialog box.
Do you find the Quick Access Toolbar useful? What commands have you added to it? Let us know in the comments. Δ Contact Us :- trendblog.guest@gmail.com